Introduction:
Installing or replacing a dryer cord can be a daunting task, especially if you encounter a 3-wire cord with no color codes. Properly connecting the wires is crucial for the safe and efficient operation of your dryer. This comprehensive guide covers every step of the process, including necessary tools, wiring steps, safety measures, and troubleshooting tips. By following these detailed instructions, you can ensure a successful installation.
How to Install a 3-Wire Dryer Cord with No Color Codes:
What Are the Steps and Considerations?
Understanding Dryer Cords:
What Are the Differences Between 3-Wire and 4-Wire Dryer Cords?
Before diving into the installation process, it’s essential to understand the differences between 3-wire and 4-wire dryer cords and why some dryers use one over the other.
Basics of 3-Wire Cords:
Traditional Wiring:
3-Wire Setup: Older homes and appliances often use 3-wire dryer cords, consisting of two hot wires and one neutral wire. These setups were standard before the National Electrical Code (NEC) updated its guidelines to include 4-wire connections for new installations.
Grounding Through Neutral: In a 3-wire setup, the dryer’s frame is grounded through the neutral wire. This configuration works but is less safe than the modern 4-wire method that includes a separate ground wire.
Introduction to 4-Wire Cords:
Modern Safety Standards:
4-Wire Setup: The 4-wire cord includes two hot wires, one neutral wire, and one ground wire. The separate ground wire enhances safety by providing an independent path for electrical faults, reducing the risk of electric shock.
NEC Requirements: The NEC requires that new dryer installations use 4-wire cords. However, many older homes still operate on 3-wire systems, making it necessary to understand both methods.
 Required Tools and Materials:
What Do You Need to Install a 3-Wire Dryer Cord?
Having the correct tools and materials ready ensures a safe and efficient installation process.
Essential Tools:
Basic Equipment:
Screwdrivers: A set of both flathead and Phillips screwdrivers will be essential for removing and securing screws during the installation process.
Wire Stripper: Wire strippers are necessary for preparing the wire ends if they are not already stripped.
Multimeter: A multimeter can check the continuity and ensure the correct voltages are present before and after installation.
Materials:
Wiring Components:
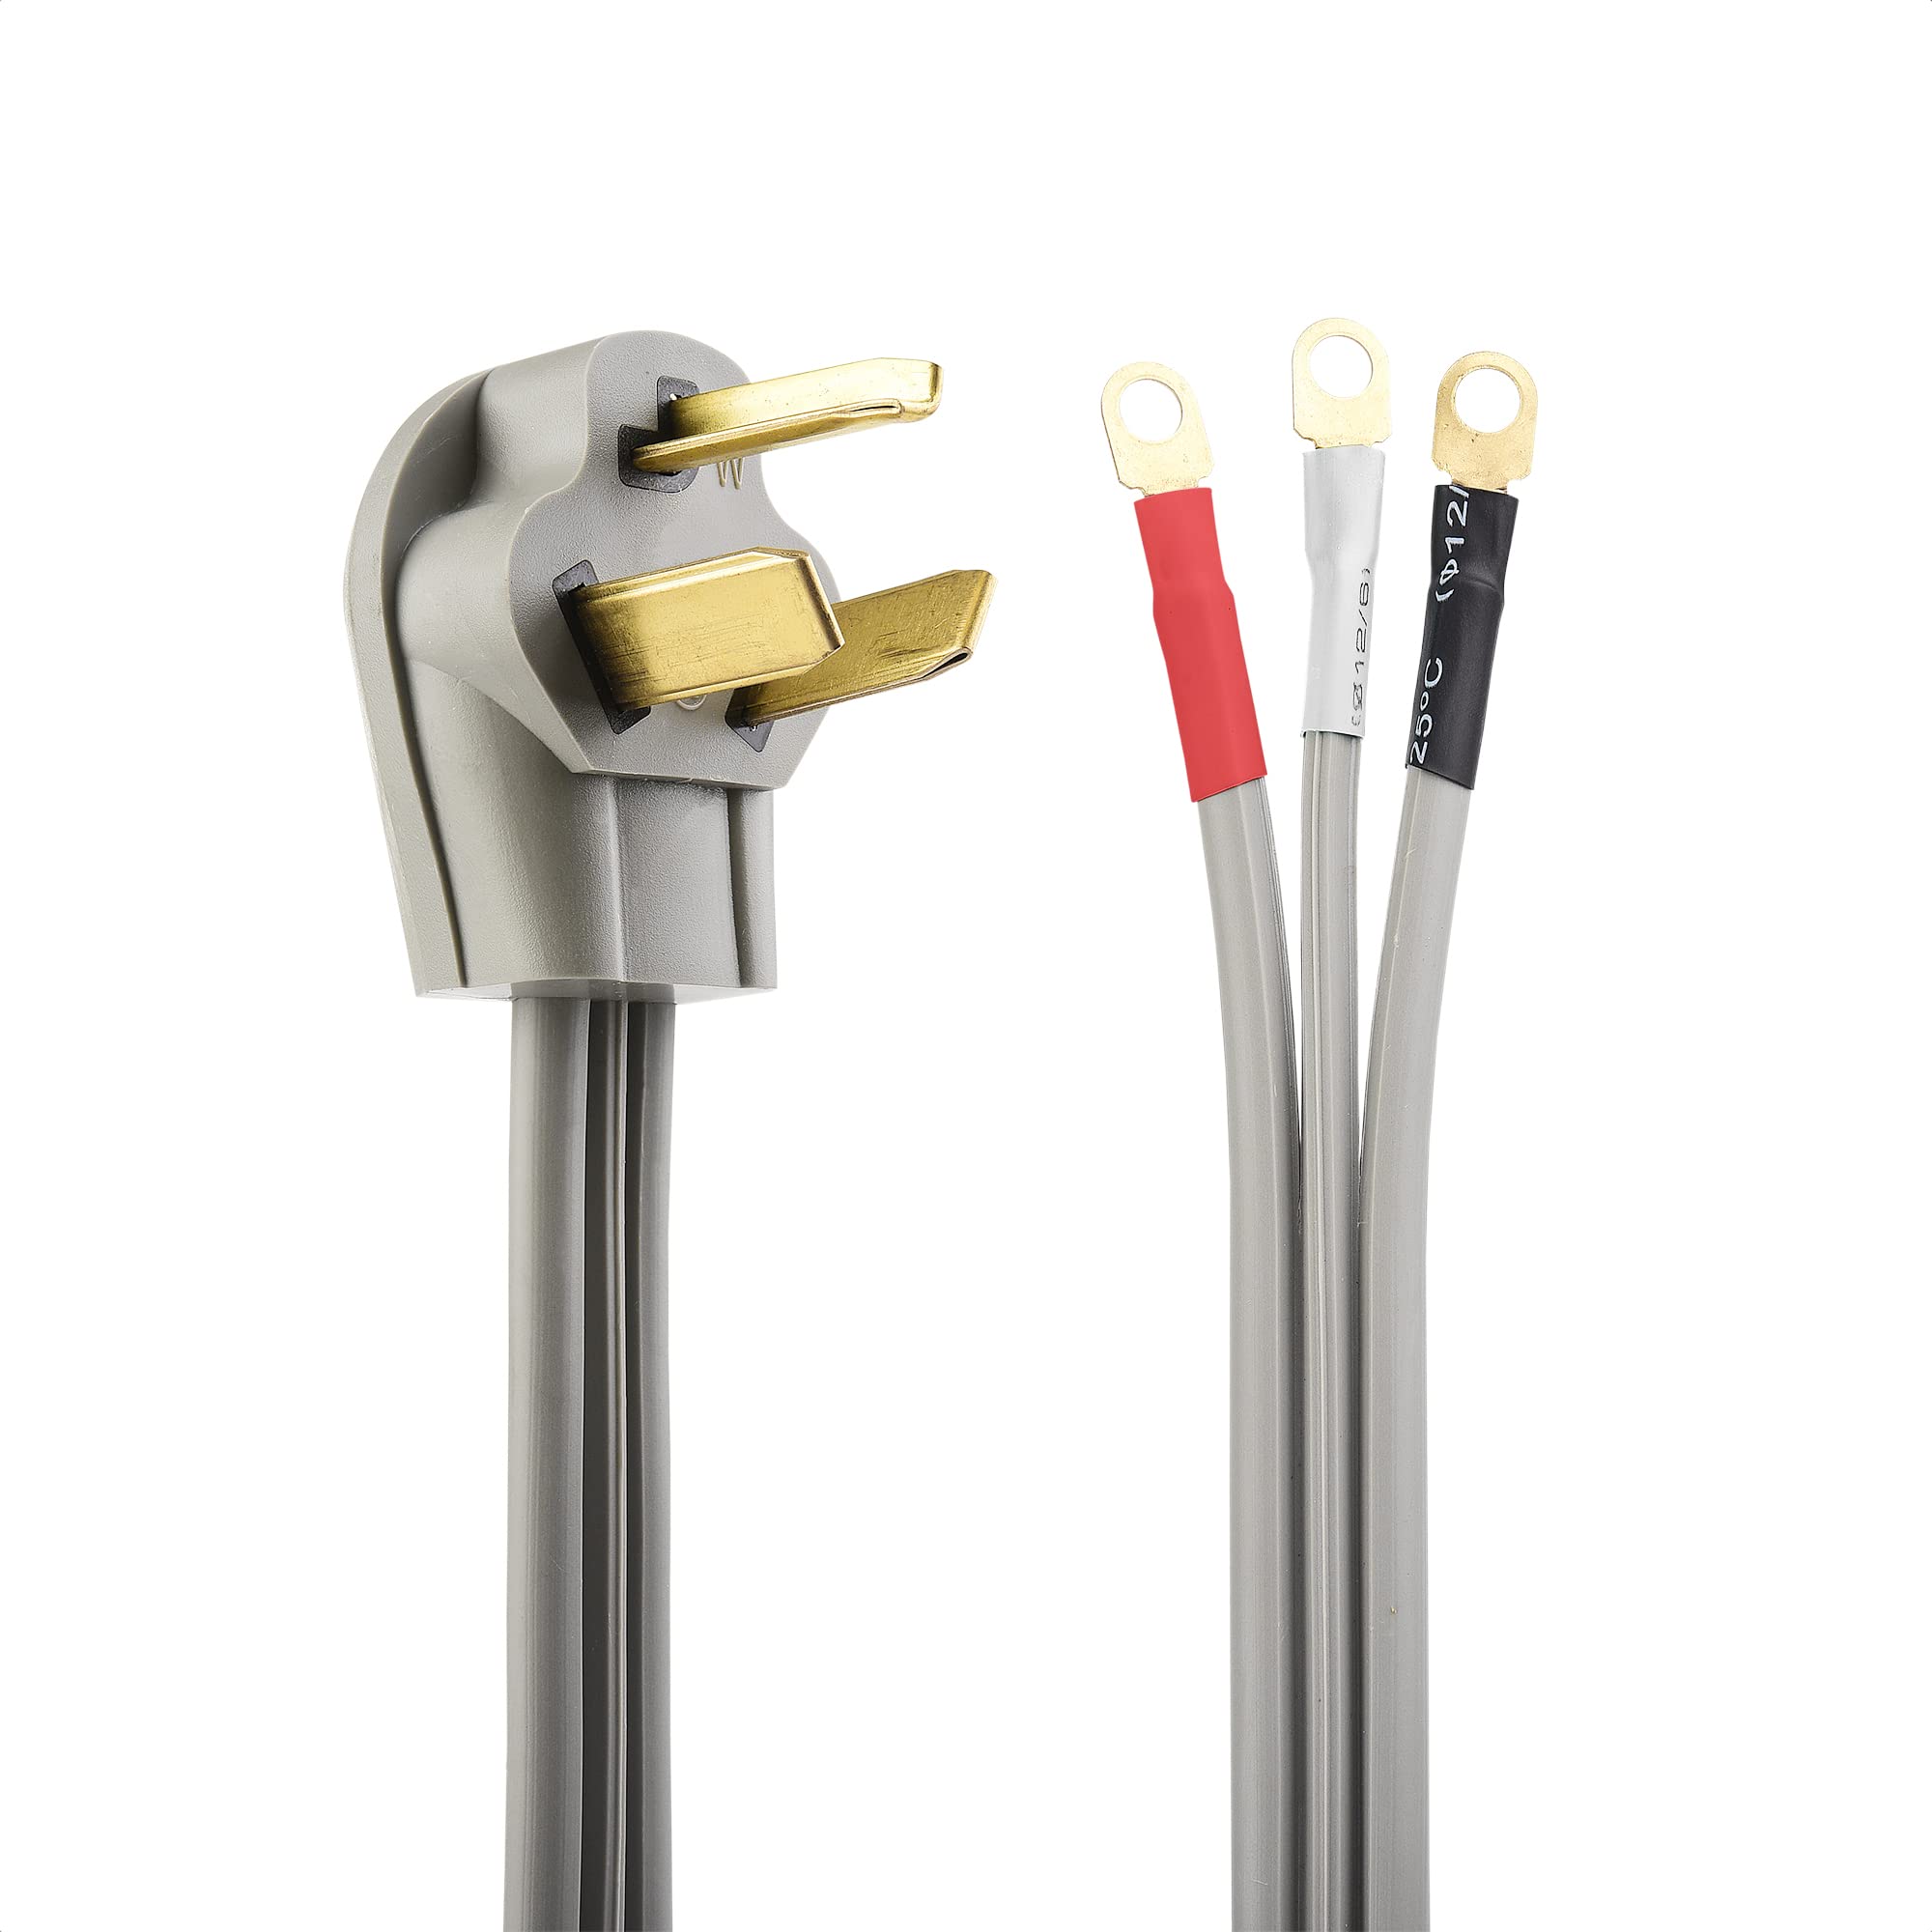
3-Wire Dryer Cord: Ensure you have a compatible 3-wire cord for your dryer model. These cords are typically available at hardware stores and online retailers.
Cord Connector: A cord connector or cable clamp will secure the dryer cord to the appliance, preventing it from being pulled out or strained.
Wire Nuts: Wire nuts may be required to secure the wire connections inside the terminal block.
Safety Measures:
How Do You Ensure Safety When Working with Electrical Wiring?
Safety is paramount when working with electrical installations to prevent injuries and equipment damage.
Power Disconnection:
Cutting the Power:
Unplugging the Dryer: Before starting the installation, unplug the dryer from the power outlet to ensure you are not working with live wires.
Circuit Breaker: For additional safety, turn off the circuit breaker that supplies power to the dryer. This adds a layer of protection against accidental electrical shocks.
 Personal Protective Equipment:
Wearing Safety Gear:
Insulated Gloves: Wear insulated gloves to protect against electrical shocks and potential wire snags.
Safety Glasses: Safety glasses protect your eyes from dust, debris, and accidental wire slips during installation.
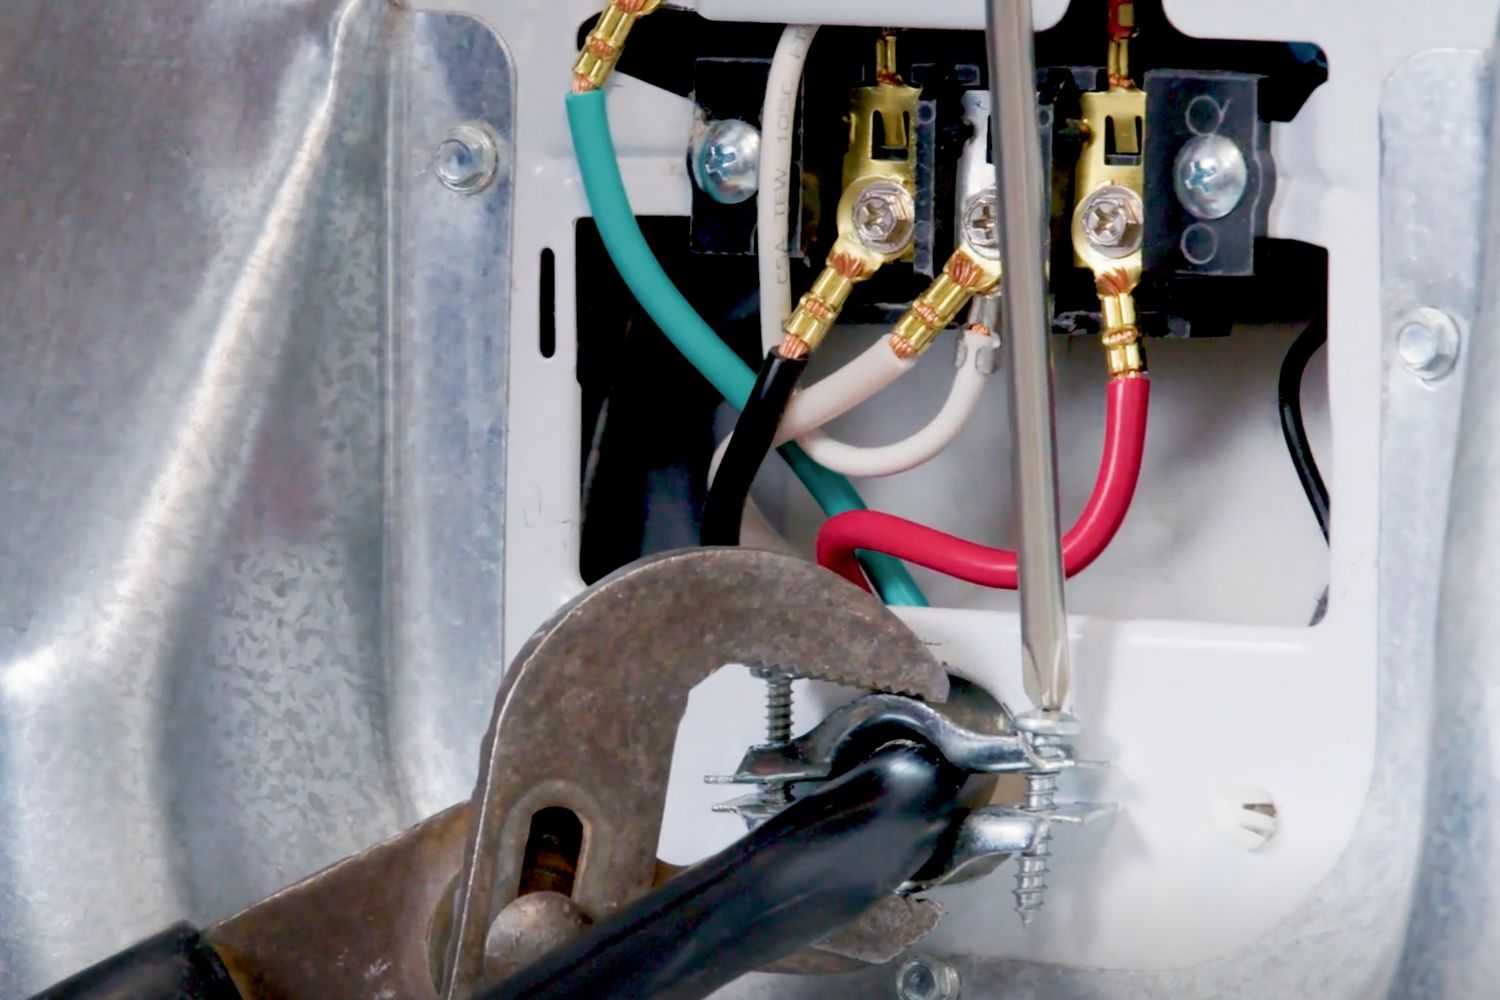
Installation Steps:
How Do You Install a 3-Wire Dryer Cord Without Color Codes?
Follow these detailed steps to properly install a 3-wire dryer cord with no color codes, ensuring each connection is secure and reliable.
Prepare the Dryer:
Accessing the Terminal Block:
Remove Cover Plate: Using a screwdriver, remove the cover plate on the back of the dryer to access the terminal block where the cord will be connected.
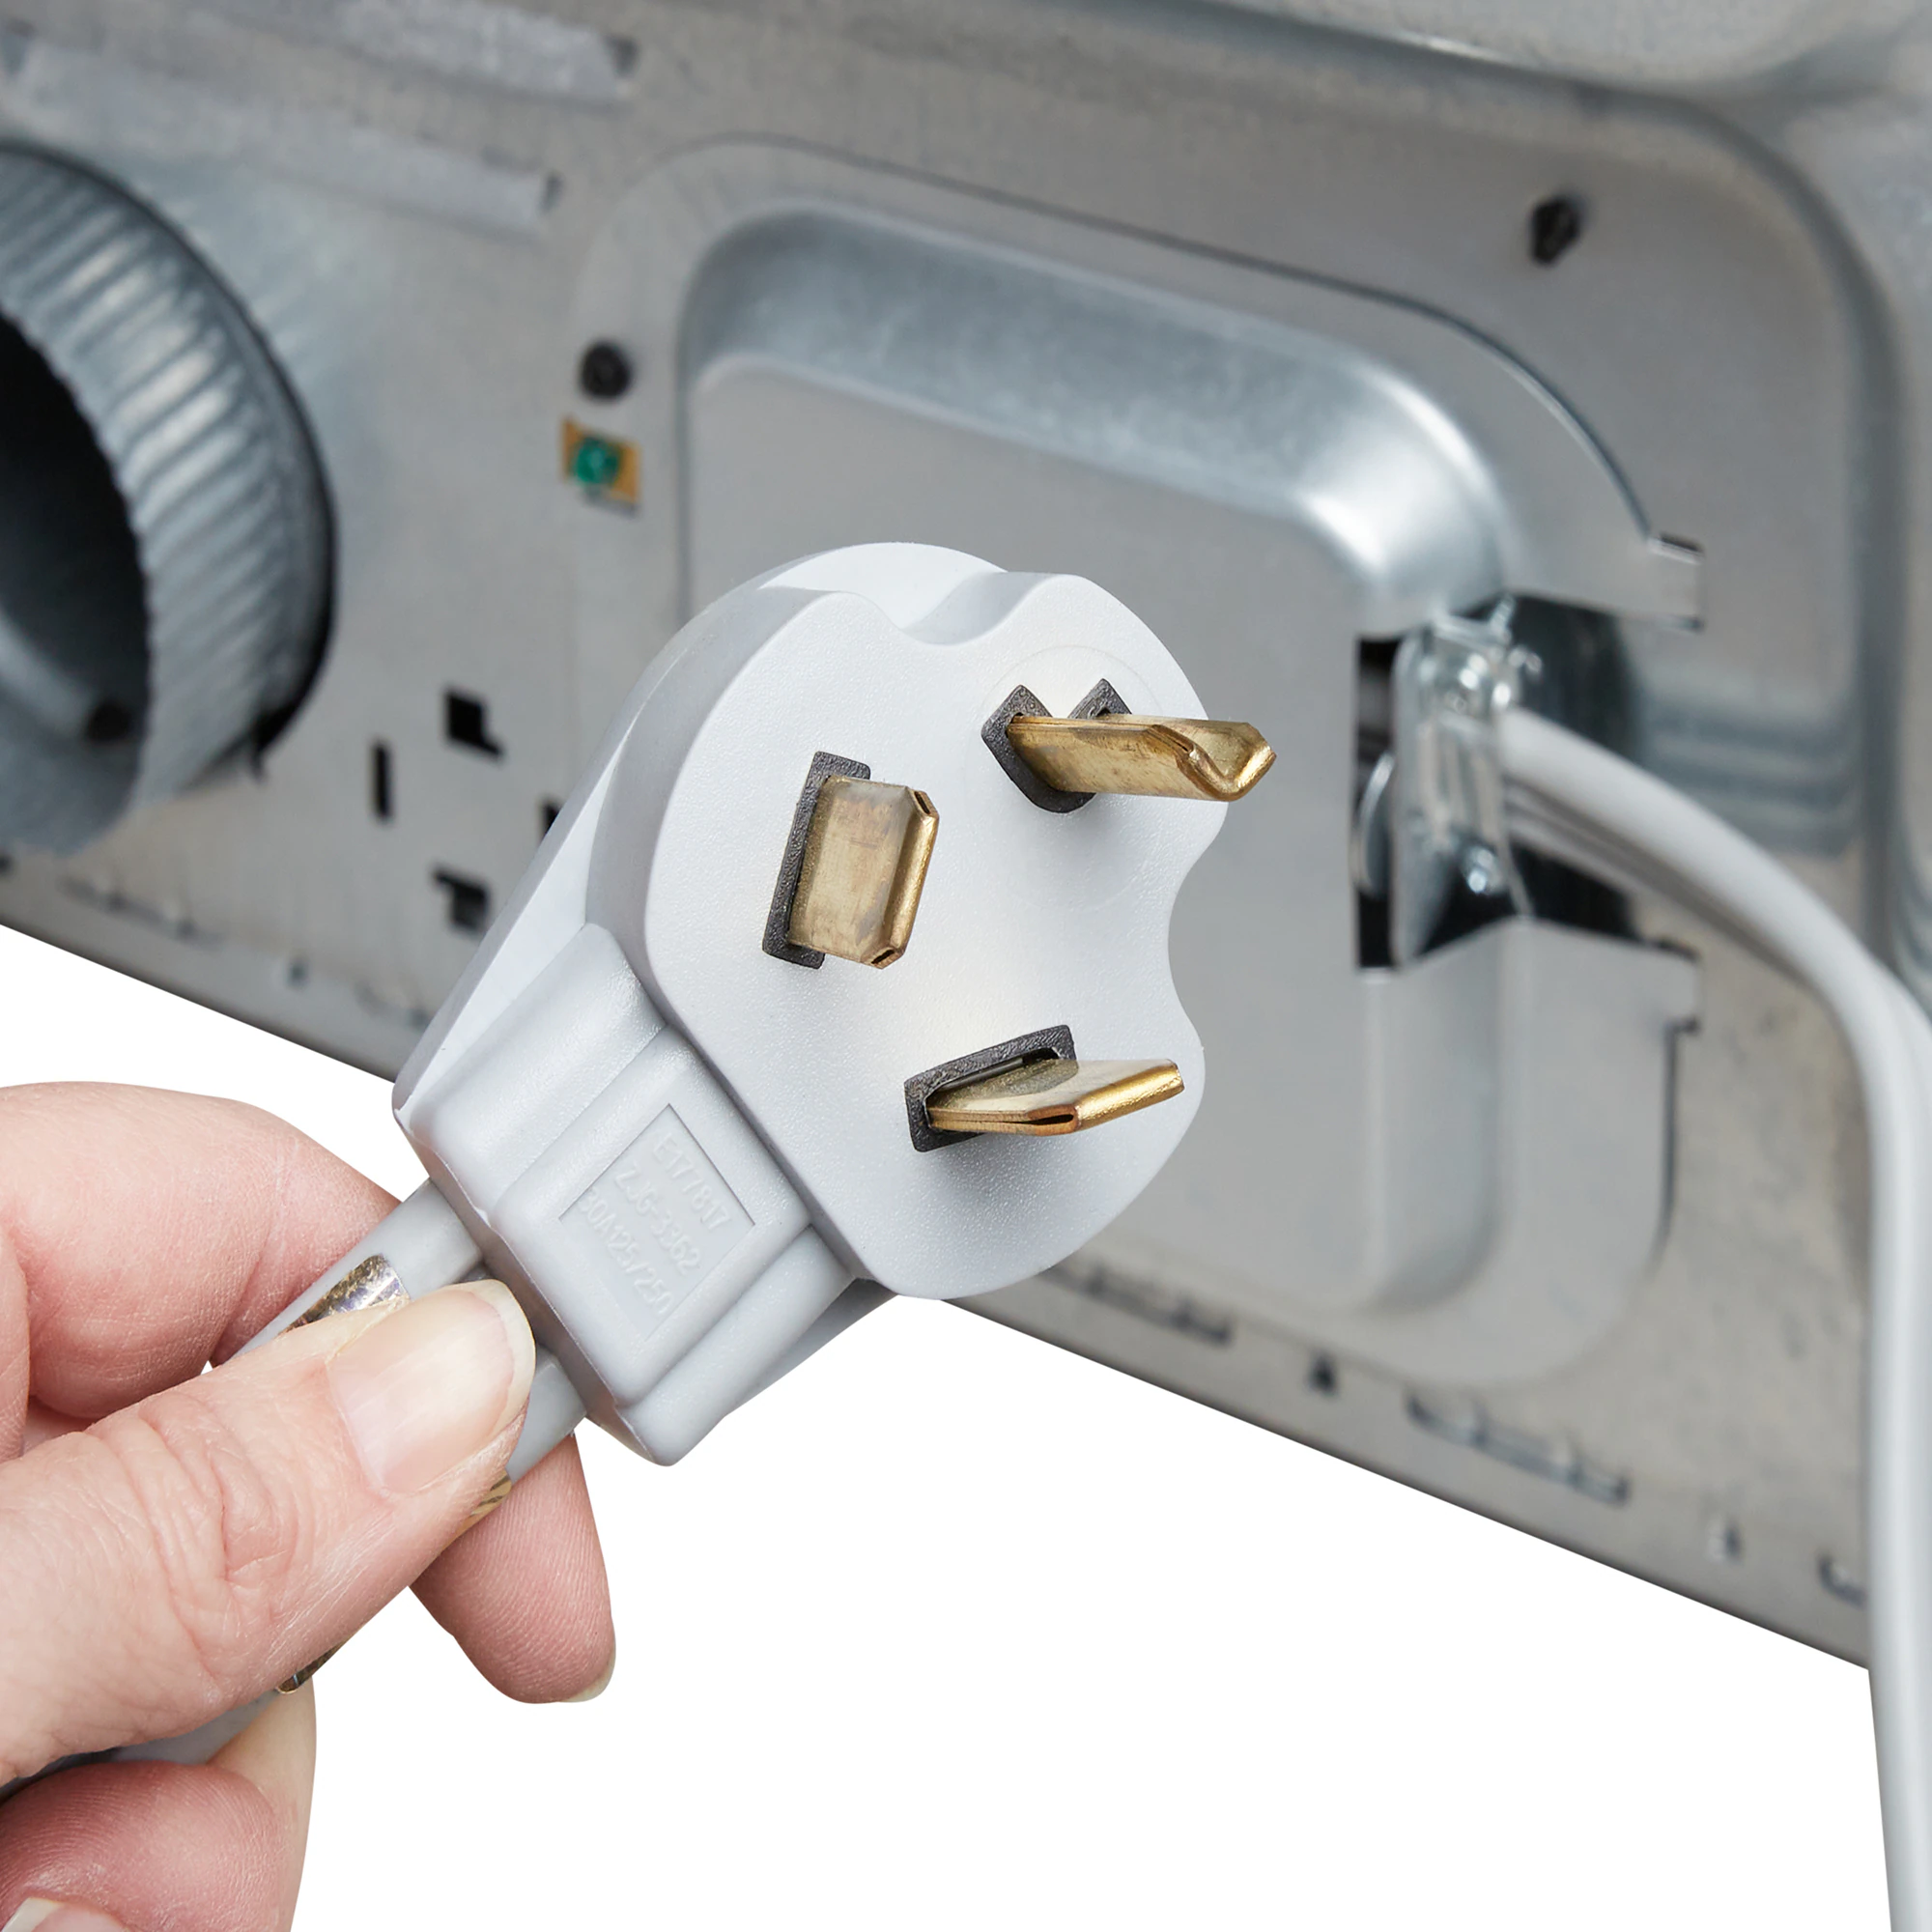
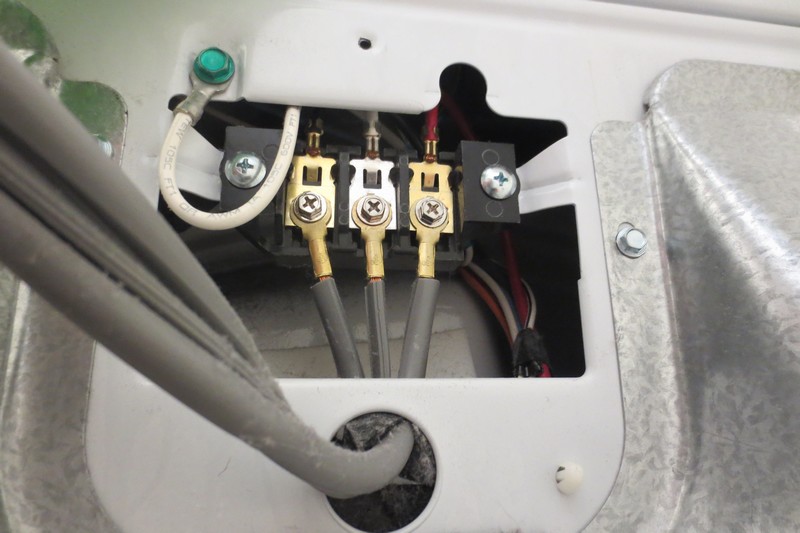
Identify Terminals: Inside the terminal block, you will typically find three terminal posts. The center terminal is the neutral connection, while the outer terminals are for the hot wires.
Preparing the Cord:
Stripping Insulation:
Prepare Wire Ends: If not already stripped, use the wire stripper to remove about 1 inch of insulation from each wire end on the dryer cord.
Securing the Cord:
Attach Cord Connector:
Install Connector: Attach the cord connector to the cord and secure it to the back panel of the dryer. This ensures the cord remains securely anchored during and after installation.
Secure the Nuts: Tighten the screws or nuts on the cord connector to firmly hold the cord in place, preventing movement and strain.
Connecting the Wires:
Making the Connections:
Attach Wires to Terminal Block:
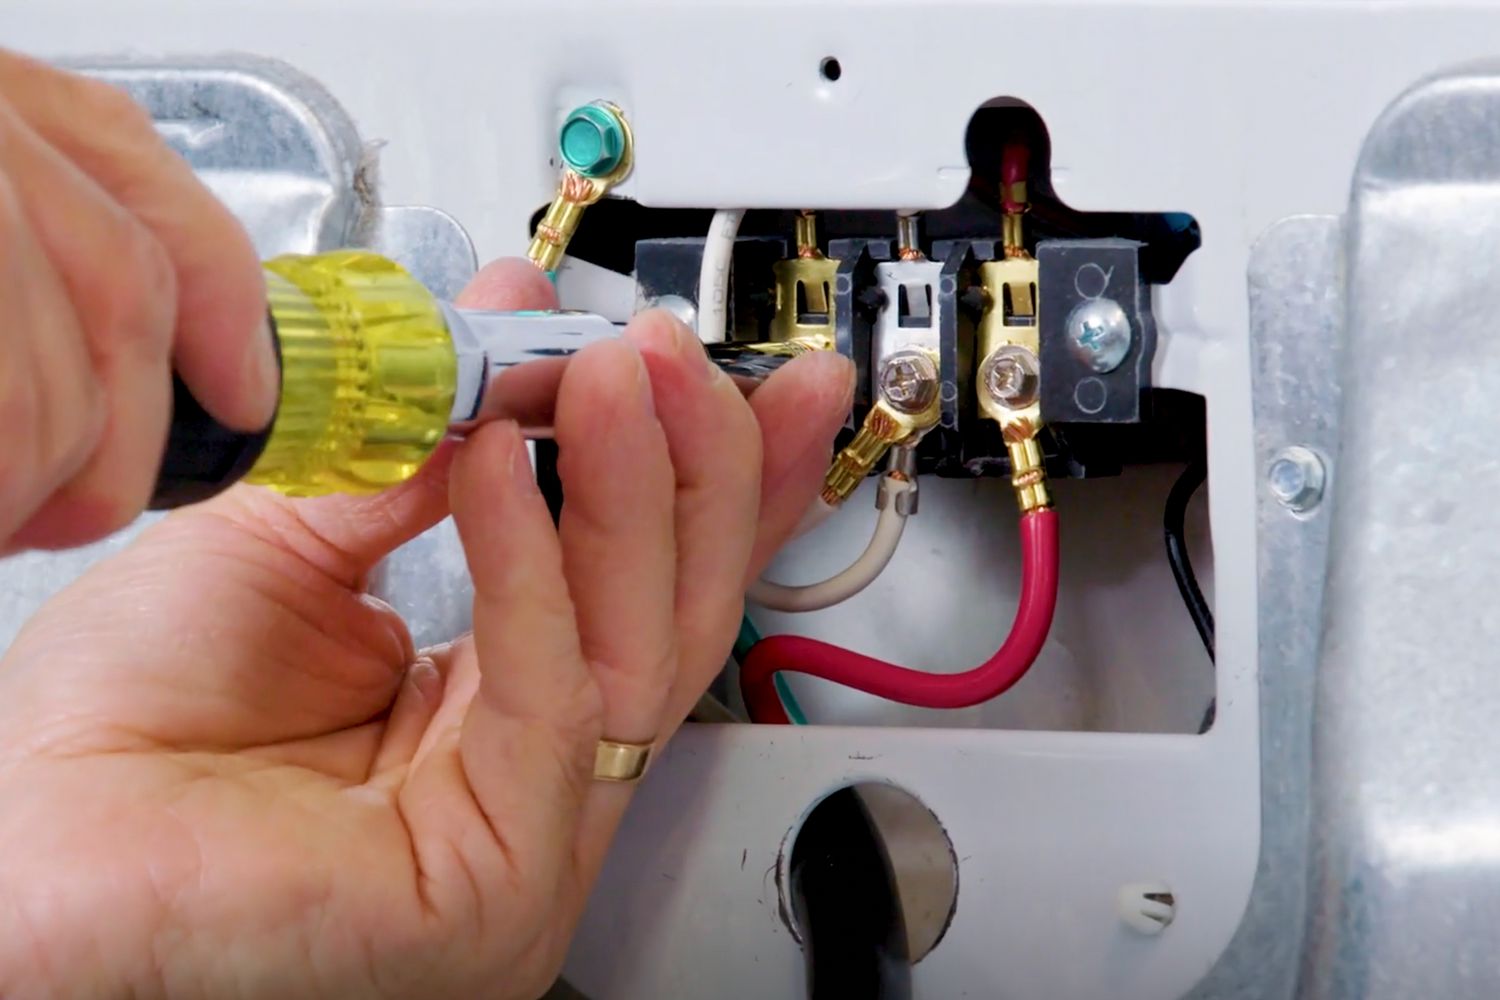
Center Terminal: Connect the middle wire of the 3-wire cord to the center terminal post. This wire is the neutral connection and must be secured tightly.
Outer Terminals: Attach the two outer wires of the 3-wire cord to the two outer terminal posts. These wires can be connected to either outer terminal, as they each carry hot current (L1 and L2).
Tighten Connections: Ensure all connections are secure by tightening the screws or nuts on the terminal posts. Loose connections can cause arcing, overheating, and potential fire hazards.
Reassembly:
Finishing Up:
Reattach Cover Plate: After all connections are secure, reattach the cover plate to the back of the dryer.
Check for Stability: Gently pull on the cord to ensure it is securely connected and clamped, preventing any accidental disconnections during dryer use.
 Testing the Installation:
How Do You Verify the Installation Is Correct and Safe?
Post-installation testing confirms that the dryer functions correctly and safely, minimizing potential issues.
Power Restoration:
Turn On Power:
Reconnect Power: Plug the dryer back into the power outlet and turn on the circuit breaker to restore power to the dryer.
Multimeter Check:
Verify Connections:
Voltage Testing: Using a multimeter, check the voltage across the terminal posts to ensure the correct voltages are present. The outer terminals should show approximately 240 volts, and each outer terminal to the center terminal should show approximately 120 volts.
Continuity Test: Perform a continuity test to ensure there are no loose connections or short circuits. This test helps identify any potential issues before using the dryer.
Functional Testing:
Run a Test Cycle:
Dryer Operation: Run the dryer through a short cycle to ensure it operates correctly. Observe for any unusual noises, overheating, or interruptions, indicating a successful installation.
 Troubleshooting Common Issues:
What Should You Do If Problems Arise During Installation?
Even with careful installation, issues can arise. Here’s how to troubleshoot common problems.
No Power to Dryer:
Check Connections:
Reconnect Wires: If the dryer doesn’t power on, double-check that all wire connections are secure and correctly attached. Loose wires are a common cause of power issues.
Inspect Cord: Ensure that the dryer cord is in good condition with no visible damage. A damaged cord may require replacement.
Dryer Overheating:
Assess Ventilation:
Check Vent Line: Overheating issues may result from blocked vent lines. Inspect and clean the dryer vent to ensure proper airflow.
Examine Connections: Verify that connections are tight and secure. Loose connections can cause overheating and potential fire hazards.
Unusual Noises:
Identify Source:
Inspect Installation: If unusual noises occur, inspect the installation for any loose components or wiring. Ensure the dryer is level and stable.
Professional Assistance: If the issue persists, consider consulting a professional electrician to diagnose and resolve the problem safely.
Conclusion
Installing a 3-wire dryer cord with no color codes involves understanding traditional and modern wiring differences, ensuring you have the right tools and materials, and following detailed, step-by-step installation procedures. Key considerations include the power disconnection for safety, properly preparing the dryer and cord, and securely connecting the wires to the terminal block. Post-installation, thorough testing using a multimeter and running a test cycle confirms correct and safe installation. Regular maintenance and troubleshooting can address common issues, ensuring continued safe operation. By following these guidelines, you can successfully install a 3-wire dryer cord, ensuring safety and efficiency in your laundry setup.